Template-based new cluster VM setup script

Some time back, I found out that my colleagues and I were using a variety of different approaches whenever we needed to create new VMs in our production environment. Since this is the sort of thing that easily causes problems through a lack of standardised configuration, I decided to create a template VM that we could use as a gold master image. Since we don’t have access to Virtual Machine Managerand its VM Templates functionality, I opted to write a script that would use the VHDX file of the gold master as the base for new VMs. The intention was to automate as much of the process as possible, while ensuring adherence to our configuration requirements.

A bit of context around how the script runs – it was written for creating VMs on a Server 2012 R2 Hyper-V cluster with heterogeneous nodes. The cluster hosts are members of one domain, but the cluster hosts VMs in several domains. The script does not currently incorporate domain-joining the new VM, but does enforce naming conventions and aspects of network configuration relating to these domains. For simplicity this is designed to be run directly on one of the cluster hosts.

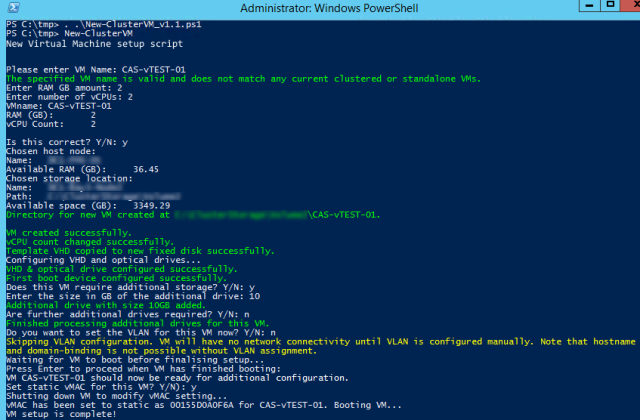
In action, the script output looks like this:

Example output of New-ClusterVM script

With that said, let’s take a look at the script.

Function New-ClusterVM {
	ipmo hyper-v,failoverclusters
	$cluster=Get-Cluster <cluster FQDN>
	$nodes=Get-ClusterNode -Cluster $cluster
	$csvs=Get-ClusterSharedVolume -Cluster $cluster

	Write-Host "New Virtual Machine setup script`n`n" -foregroundcolor white
	[boolean]$validname=$false
	$clusterVMs=@(); 
	foreach ($vm in (Get-ClusterResource -Cluster $cluster | ? {$_.ResourceType -eq "Virtual Machine"} | Select Name)) {
		$clusterVMs+=($vm.Name -Replace "Virtual Machine ","")
	}	
	$nodeVMs=@()
	foreach ($node in $nodes) {
		$nodeVMs+=Get-VM -ComputerName $node.Name | ? {$_.IsClustered -eq $false -and $_.State -ne "OffCritical"}
	}
	while (!$validname) {
		$VMName=Read-Host("Please enter VM Name")
		if ($vmName -notmatch "^<prefix1>|^<prefix2>|...|^<prefixN>") {
			Write-Host "The specified VM name does not have a valid prefix. Please add a prefix to the VM name, according to the network & domain in which this VM will operate." -foregroundcolor red
		} elseif ($($clusterVms | ? {$_ -match $VMName})) {
			Write-host "Invalid VM name specified; a VM with a matching name already exists in the cluster." -foregroundcolor red
		} elseif ($($nodeVMs | ? {$_.Name -match $VMName} | Select ComputerName).ComputerName) {
			Write-host "Invalid VM name specified; a VM with a matching already exists on $(($nodeVMs | ? {$_.Name -match $VMName} | Select ComputerName).ComputerName)." -foregroundcolor red
		} else {
			Write-Host "The specified VM name is valid and does not match any current clustered or standalone VMs." -foregroundcolor green;
			$validname=$true
		}
	}
	Remove-Variable validname,clustervms,nodevms -Force -ErrorAction SilentlyContinue

Straightforward stuff to start with – import the required modules, then get the basic information about the cluster nodes and storage. After that, validation is performed against a user-specified VM name to ensure two things:
1) It uses one of our standard prefixes based on the networks & domains in which cluster VMs operate, and
2) It does not match the name of an existing VM. This requires two checks – one against clustered virtual machines, the other against unclustered VMs on a single host. In theory no unclustered VMs should be active on a cluster host for any significant period of time, but this way the script ensures that two people don’t attempt to create a VM for the same function on different hosts.

	[double]$RAM=Read-Host("Enter RAM GB amount")
	$RAM=$RAM*1024*1024*1024
	$count=Read-Host("Enter number of vCPUs")
	Write-Host "VMname:`t$($vmname)`nRAM (GB):`t$($RAM/(1024*1024*1024))`nvCPU Count:`t$($count)`n"
	$proceed=Read-Host("Is this correct? Y/N")
	
	if ($proceed -eq "Y") {
		[string]$CandidateNode=$null
		[single]$CandidateFreeRAM=$null
		foreach ($node in $nodes) {
			[single]$free="{0:N2}" -f ((Get-WMIObject -ComputerName $node Win32_PerfRawData_PerfOS_Memory).AvailableMBytes/1024)
			if ((!$CandidateNode) -or ($free -gt $CandidateFreeRAM)) {
				$CandidateNode=$node.Name
				$CandidateFreeRAM=$free
			}
			Remove-Variable -Name free -Force -ErrorAction SilentlyContinue
		}
		Write-Host "Chosen host node:`nName:`t$($CandidateNode)`nAvailable RAM (GB):`t$($CandidateFreeRAM)"	
		
		[string]$CandidatePath=$null
		[string]$CandidateName=$null
		[single]$CandidateFreeSpace=$null
		foreach ($csv in $csvs) {
			[single]$free="{0:N2}" -f $(($csv | Select -Expand SharedVolumeInfo | Select -Expand Partition).FreeSpace /(1024*1024*1024))
			if ((!$CandidatePath) -or ($free -gt $CandidateFreeSpace)) {
				$CandidatePath=($csv | Select -Expand SharedVolumeInfo).FriendlyVolumeName
				$CandidateName=$csv.Name
				$CandidateFreeSpace=$free	
			}
			Remove-Variable -Name free -Force -ErrorAction SilentlyContinue
		}
		Write-Host "Chosen storage location:`nName:`t$($CandidateName)`nPath:`t$($CandidatePath)`nAvailable space (GB):`t$($CandidateFreeSpace)"

Next up, we're setting the desired specifications for the new VM. When a required RAM and vCPU count is specified and confirmed by the user, each node is checked in turn for its free RAM in GB. The node with the most free RAM is designated as the candidate node for the new VM. Similarly, the cluster storage volumes are checked for available storage and the volume with the greatest amount of free space is designated as the candidate storage volume.

At this stage a check for the assigned-vCPU:total-CPU cores ratio for each host could also be carried out to avoid placing a CPU-intensive VM on a host already burdened with high CPU usage. At the time of writing RAM constraints are a more significant factor for the hypervisor hosts than CPU cores. In a similar fashion, the storage check does not take into account that different volumes may have different performance profiles. At the time of writing, performance differences between volumes are generally not a significant consideration for us when deploying new VMs.


		try {
			New-Item $($CandidatePath+"\"+$vmname) -Type Directory -ErrorAction Stop | Out-Null
			Write-Host "Directory for new VM created at $($candidatepath+'\'+$vmname)." -foregroundcolor green
		} catch {
			Write-Host "Could not create directory for new VM." -foregroundcolor red
		}
		try {
			New-VM -ComputerName $candidateNode -VMName $VMName -MemoryStartUpBytes $RAM -NoVHD -SwitchName <vSwitchName> -Generation 2 -Path $CandidatePath
			Write-Host "VM created successfully." -foregroundcolor green
			Set-VMProcessor -ComputerName $candidateNode -VMName $vmname -Count $count -CompatibilityForMigrationEnabled $true
			Write-Host "vCPU count changed successfully." -foregroundcolor green		
			[boolean]$continue=$true
		} catch {
			Write-Host "VM creation or vCPU configuration failed, error was:`n$($_.Exception.Message)" -foregroundcolor red
			[boolean]$continue=$false
		}
		try {
			$newpath=$($CandidatePath+"\"+$vmname)+"\Virtual Hard Disks\"
			mkdir $newpath
			$newname=$vmname+"_0_(C).vhdx"
			[string]$fullpath=$newpath+$newname
			Convert-VHD -Path <Full path to template VHDX file> -DestinationPath $fullpath -VHDType Dynamic
			Write-Host "Template VHD copied to new fixed disk successfully." -foregroundcolor green
		} catch {
			Write-Host "An error occured getting the template VHD ready, error was:`n$($_.Exception.Message)" -foregroundcolor red
			$continue=$false
		}
		Write-Host "Configuring VHD and optical drives..."
		try {
			Add-VMHardDiskDrive -ComputerName $candidateNode -VMName $vmname -ControllerNumber 0 -ControllerLocation 0 -ControllerType SCSI
			Set-VMHardDiskDrive -ComputerName $candidateNode -VMName $vmname -Path $($newpath+$newname) -ControllerNumber 0 -ControllerLocation 0
			Add-VMDVDDrive -ComputerName $candidateNode -VMName $vmname -ControllerLocation 1
			Write-Host "VHD & optical drive configured successfully." -foregroundcolor green
		} catch {
			Write-Host "An error occured configuring the VHD and optical drives, error was:`n$($_.Exception.Message)" -foregroundcolor red
			$continue=$false			
		}
		try {
			$vhdx=Get-VMHardDiskDrive -ComputerName $candidateNode -VMname $vmname
			Set-VMFirmware -ComputerName $candidateNode -VMName $vmname -FirstBootDevice $vhdx
			Write-Host "First boot device configured successfully." -foregroundcolor green
		} catch {
			Write-Host "An error occured configuring first boot device, error was:`n$($_.Exception.Message)" -foregroundcolor red
			$continue=$false				
		}

We're now ready to create and configure the VM. First up, an individual directory is created for the VM using the designated cluster volume path and VM name. Once that's done, the VM is created on the candidate hypervisor host, with the specified RAM and no mapped virtual disks. In our case we use a standard virtual switch for all VMs and use VLANs to segregate between networks.

When the VM has been created, the vCPU count is set to the specified value. Due to the aforementioned heterogeneous hypervisor hosts in the cluster, CPU Migration Compatibility is enabled at this stage as well. A boolean value is used throughout this section to capture a failure at any stage and prevent subsequent tasks from being attempted.

After setting the vCPU options, a "Virtual Hard Disks" subdirectory is created in the new VM's directory. The gold master image is then copied as a Dynamic VHDX file to the Virtual Hard Disks directory. The new VHDX has a name indicating the controller location to which it will be attached as well as the drive letter that will be assigned to it. Once the copy is complete, a new SCSI controller is added to the new VM and the new VHDX file is attached to it, along with a virtual DVD drive. Lastly, the virtual disk is configured as the first boot device for the new VM.

		if ($(Read-Host("Does this VM require additional storage? Y/N")) -like "Y") {
			[boolean]$done=$false
			[int]$drivecount=1
			while (!$done) {
				[boolean]$validsize=$false
				while (!$validsize) {
					try {
						$drivesize=Read-Host("Enter the size in GB of the additional drive")
						$drivesize=[int]$drivesize*(1024*1024*1024)
						$validsize=$true
					} catch {
						Write-Host "Please enter an integer number for the size in GB of the additional drive!" -foregroundcolor yellow
						Start-Sleep 3
					}
				}
				try {
					#for drive letter assignment, use [char]$number with numbers 68 (D, upper-case) to 90 (Z, upper-case) to assign. 
					$driveletter=[char]$(68+$drivecount)
					[string]$drive=$newpath+"\"+$vmname+"_$($drivecount)_($($driveletter)).vhdx"
					$fixed=Read-Host("Does the additional storage need to be fixed drive (e.g. for SQL servers)? Y/N")
					if ($fixed -eq "Y") {
						New-VHD -Path $drive -SizeBytes $drivesize -Fixed -LogicalSectorSize 4KB -PhysicalSectorSize 4KB -ComputerName $candidateNode | Out-Null
					} else {	
						New-VHD -Path $drive -SizeBytes $drivesize -Dynamic -LogicalSectorSize 4KB -PhysicalSectorSize 4KB -ComputerName $candidateNode | Out-Null
					}
					Add-VMHardDiskDrive -ComputerName $candidateNode -VMName $vmname -ControllerType SCSI -ControllerNumber 0 -ControllerLocation $($drivecount+1)
					Set-VMHardDiskDrive -ComputerName $candidateNode -VMName $vmname -Path $drive -ControllerNumber 0 -ControllerLocation $($drivecount+1)
					Write-Host "Additional drive with size $($drivesize/(1024*1024*1024))GB added." -foregroundcolor green
				} catch {
					Write-Host "An error occured congiguring the additional drive, error was:`n$($_.Exception.Message)" -foregroundcolor red
				}
				[boolean]$valid=$false;
				while (!$valid) {
					$check=Read-Host("Are further additional drives required? Y/N")
					switch ($check) {
						"Y" {
							Remove-Variable -Name drivesize,driveletter,drive,fixed -Force -ErrorAction SilentlyContinue;
							$drivecount++
							$valid=$true;
							break;
						}				
						"N" {
							$valid=$true;
							$done=$true;
							break;
						}
						default {
							Write-Host "Invalid response, please try again." -foregroundcolor yellow
						}
					}
				}
			}
			Remove-Variable -Name done,drivecount,done,valid -Force -ErrorAction SilentlyContinue
		}
		Write-Host "Finished processing additional drives for this VM." -foregroundcolor green

Next up, the script checks if additional drives are required for the VM, for example if it will be used to host a database system like AD, Exchange or SQL Server. This part took a few attempts to get right, but I'm quite happy with how it works now. If additional storage is requested, a new integer named drivecount is declared with an initial value of 1. A while-loop is then started. Each iteration of the loop proceeds as follows:

First, the new drive's capacity is requested, and the specified value is checked. Then, the drive letter for the new drive is set by casting an integer as a [char] type. This starts from 68 (capital D) and adds the drivecount value - so the first additional drive will be E, the second F etc. (Yes, the script will hit an error if the user attempts to add 22 drives, as the 22nd drive will attempt to use "[" ([char]91) as its drive letter. I am comfortable with the assumption that no operator using this script will attempt to add that many additional drives in one go, although an argument can be made for introducing a specific error trap to handle that circumstance.) After setting the drive letter, a prompt is displayed checking if the new storage location needs to be a fixed drive for performance optimisation. Based on the response, a new VHD file is created (using standard logical and physical sector sizes), an additional virtual hard disk is added to the VM on its existing SCSI controller, and the path for the new virtual hard disk is set to the new VHD file.

At the end of the process, the user is asked if further storage is required. If more additional drives are required, the drivesize, driveletter, drive, and fixed variables are removed. The drivecount variable is incremented, and the loop iterates again. If no further drives are required, the remaining variables are removed and the loop terminates.

	Get-VM -VMName $vmname -ComputerName $CandidateNode | Add-ClusterVirtualMachineRole -Cluster $cluster

	[boolean]$valid=$false
	while (!$valid) {
		$enableVLAN=Read-Host("Do you want to set the VLAN for this VM now? Y/N")
		switch ($enableVLAN) {
			"Y" {
				if ($vmname -match "^<prefix1>") {
					try {
						Get-VMNetworkAdapter -VMName $VMName -ComputerName $CandidateNode | Set-VMNetworkAdapterVlan -Access -VLAN <prefix1 VLAN #>
						Write-Host "Enabled VLAN <prefix1 VLAN #> for network adapter on $($VMname)." -foregroundcolor green
					} catch {
						Write-Host "Enabling VLAN <prefix1 VLAN #> for network adapter on $($VMName) failed; the error message was:`n$($_.Exception.Message)" -foregroundcolor red
					}
				} elseif ($vmname -match "^<prefix2>") {
					try {
						Get-VMNetworkAdapter -VMName $VMName -ComputerName $CandidateNode | Set-VMNetworkAdapterVlan -Access -VLAN <prefix2 VLAN #>
						Write-Host "Enabled VLAN <prefix2 VLAN #> for network adapter on $($VMname)." -foregroundcolor green
					} catch {
						Write-Host "Enabling VLAN <prefix2 VLAN #> for network adapter on $($VMName) failed; the error message was:`n$($_.Exception.Message)" -foregroundcolor red
					}
				} <# additional prefixes and vLAN assignments follow here #>
				 else {
					Write-Host "No profile exists for VM prefix; VLAN will need to be configured manually. VM will have no network connectivity until this is done!" -foregroundcolor yellow
				}
				$valid=$true;
				break;
			}
			"N" {
				Write-Host "Skipping VLAN configuration. VM will have no network connectivity until VLAN is configured manually. Note that hostname and domain-binding is not possible without VLAN assignment." -foregroundcolor yellow;
				$valid=$true;
				break;
			}
			default {
				Write-Host "Invalid response, please enter Y or N." -foregroundcolor red;
				break;
			}
		}
	}
	Remove-Variable -Name valid,enableVlan -Force -ErrorAction SilentlyContinue

With the storage configuration now set for the VM, it is added as a cluster role.

Next, the script checks if this VM needs to have a VLAN set. If this is selected, an if-else loop is used to iterate through the list of prefixes and associated VLANs (the list has been truncated in the script above for brevity). In each case, the VM name determines teh VLAN number, which is then set using Set-VMNetworkAdapterVLAN.

	Start-VM -Computername $CandidateNode -VMName $VMName
	Write-Host "Waiting for VM to boot before finalising setup..."
	Start-Sleep 240

	$finish=Read-Host("Press Enter to proceed when VM has finished booting")
	Remove-Variable -Name finish -force -erroraction silentlycontinue
	$ComputerSystem = Get-WmiObject -Query "select * from Msvm_ComputerSystem where ElementName = '$($VMName)'" -Namespace "root\virtualization\v2" -ComputerName $CandidateNode;
	$Keyboard = Get-WmiObject -Query "ASSOCIATORS OF {$($ComputerSystem.path.path)} WHERE resultClass = Msvm_Keyboard" -Namespace "root\virtualization\v2" -ComputerName $CandidateNode;
	$Keyboard.InvokeMethod("PressKey","18") | Out-Null;
	$Keyboard.InvokeMethod("PressKey","78") | Out-Null;
	$Keyboard.InvokeMethod("ReleaseKey","18") | Out-Null;
	$Keyboard.InvokeMethod("ReleaseKey","78") | Out-Null;
	Write-Host "VM $($vmname) should now be ready for additional configuration." -foregroundcolor white
	
	Enable-VMIntegrationService "Guest Service Interface" -VMName $vmName -ComputerName $CandidateNode

The setup process is almost complete by now. The new VM is booted and the script waits for 4 minutes to allow the boot process to complete. (The 4-minutes is a trial-and-error value arrived at over several tests of the script, and will vary based on both the VM configuration and host hypervisor load). The wait is required due to a quirk in our gold master image I have been unable to resolve - the OS image in use detects the regional and language settings specified in unattend.xml, but still requires them to be confirmed on first boot. For a while I was stuck here, until I read this very helpful post describing how to use the MSVM_Keyboard WMI class to pass keystrokes to a VM without routing through a network connection. Windows Server 2016 has finally resolved this issue with the introduction of PowerShell Direct, but it's still useful to know about - for example, the virtual-keyboard class above got me thinking and led to me finding out about the wShell SendKeys method, which I've used in other scripts that need to interact with a shell application.

The key presses here are "Alt" and "N", which is the hotkey for the "Next" prompt displayed by the VM on boot. After this, the VM will finish booting to the login screen.

The last line here is to enable the "Guest Service Interface" integration service. This is disabled by default, but allows for scripted transfer of files between the VM and its host using Copy-VMFile rather than having to rely on either mounting ISO images or using network paths. This is also functionality rendered obsolete by PowerShell Direct, which enables copying files between VM and host using Copy-Item.

	$static=Read-Host("Set static vMAC for this VM? Y/N)")
	if ($static -eq "y") {
		Write-Host "Shutting down VM to modify vMAC setting..."
		try {
			Stop-VM -Name $vmName -ComputerName $CandidateNode
			while ((Get-VM -Name $vmname -ComputerName $candidateNode).State -ne "Off") {
				Start-Sleep 10
			}
			$MACAddress=(Get-VMNetworkAdapter -ComputerName $CandidateNode -VMName $VMName).MacAddress
			$vNIC=(Get-VMNetworkAdapter -ComputerName $CandidateNode -VMName $VMName).Name
			Set-VMNetworkAdapter -ComputerName $candidateNode -VMName $VMName -StaticMacAddress $MACAddress -Name $vNIC
			Write-Host "vMAC has been set to static as $($MACAddress) for $($vmName). Booting VM..."
			Start-VM -Name $vmName -ComputerName $CandidateNode
			Start-sleep 30
		} catch {
			Write-Host "An error occured while setting a static vMAC for $($vmname), message was:`n$($_.Exception.Message)" -foregroundcolor red
		}
	}
	Write-Host "VM setup is complete!"		
}

The default behaviour in Hyper-V is to assign a dynamic vMAC. The format of the vMAC is as follows - the first 3 bytes are always "00:15:5D", the 4th and 5th bytes are derived from the lowest 2 octets of the IP address on the host hypervisor's first NIC, and the last byte is automatically generated. The final thing my script does is to check if the VM should have a static virtual MAC address. I include this because I have been bitten by a non-obvious aspect of dynamic virtual MAC addresses in the past, in a way that requries some explanation.

The problem arose with a Linux-based appliance VM on our network, after it had to be moved between hosts. After the host move it was working correctly. A subsequent reboot required to apply a straightforward configuration update for the appliance rendered all of its services offline, for no obvious reason. The appliance had booted correctly, a console connection showed the configuration was still retained, and we were mystified. We contacted support and started a remote session. After a bit of digging, the support team asked if we had changed the VM hardware, we said "no".

The cause was the reboot - after the VM restarted, its dynamically-assigned vMAC was changed, because it had moved to a new host. Because of this, the VM's OS saw that it had lost NIC1 and gained NIC2. So it booted NIC2 with default DHCP configuration, rather than the specific static IP configuration required by the appliance. (Somewhat unhelpfully, none of this was reported on the console interface and, being an appliance, we as customers did not have the necessary administrative access to investigate further). Once the cause was identified, the fix was straightforward, but to avoid future repetition of this issue I chose to set the vMAC as static on that VM, and to offer the option to set vMACs as static during the setup of future VMs. Since it requires the VM to shutdown, it's better done during initial setup.

It's worth noting that my solution here is an incomplete one - vMACs should ideally be managed in a similar way to DHCP reservations, but Hyper-V and Failover Cluster Manager don't really provide any useful tools for doing this across a cluster, though you can check the address range for a given host using Virtual Switch Manager. You can also use PowerShell to check the virtual MAC address range for your hosts as described here. If you are unlucky and you do not manage your vMAC assignment, you can end up running into vMAC range clashes as described here. If you have the option of using System Center and Virtual Machine Manager, you can manage global vMAC address pools across your cluster.

This version of the script has been the one in use for a while now - it works reliably, and is functional enough. There are a number of things I'd like to do to improve it in future, including:

  • Add logging.
  • Enable running the script remotely over a PSSession. At present this does not work, potentially due to an issue with elevating permissions over a remote session.
  • Add some form of vCPU-to-CPU-core ratio check as part of the candidate node selection.
  • Add an option for setting multiple storage performance classes on cluster storage volumes.
  • Add a VM profile category to automatically configure certain aspects, e.g. a SQL Server profile would automatically require 2 additional fixed drives (1 for the database, 1 for logs).
  • Add vMAC address checking to avoid conflicts with existing VMs (conflicts on the candidate node would prevent the VM from booting, but that doesn't take into account VMs running on other nodes in the cluster).
  • Expand on the virtual keyboard functionality to allow automatically setting the hostname within the VM, join it to a domain, and so on.

Whether or not these ever become sufficiently pressing requirements to make me implement them is another matter, however...

Checking permissions on home & profile directories

As I mentioned in my last post I started a new job recently, and have been trying to harness PowerShell to help automate things or at least accelerate them. Here’s a slightly longer example I wrote recently after noting a series of calls coming through for users who did not have the permissions correctly set on their home and profile directories. It’s not a spectacularly complex script, but I found a few interesting things along the way.

Firstly, parameter declarations. I’ve been meaning to get around to this for ages, but being a bit of a sucker for menu-driven functions I kept on putting this off for the version 2 of whatever script I was writing. I recently started watching my way through the Microsoft Virtual Academy “Advanced Tools & Scripting With PowerShell 3.0 Jump Start” videos, and it was in one of these videos that I realised just how simple parameter definition really is:

param(
    [<type>]$parametername
)

Which is pretty nice and straightforward. Of course, I don’t like throwing my valid-input checks under the bus completely, so I’ve ended up parametrising my input while also having a validity test and input process on the functions where I’ve implemented this so far. It’s still an improvement.

I also learned a bit more about the switch statement. I’ve mentioned somewhere previously that switches become a lot more useful and powerful if you use the -regex flag; what I didn’t realise is that there is also a -wildcard flag that allows for easy fragment matching; particularly useful in the context of partial string matches, which is what I was interested in.

I also learned about the Get-ACL cmdlet. As the name implies, it’s used for querying Access Control Lists. Fundamentally, what I was trying to do was build a custom function around the specific invocation

((Get-ACL -Path $path).AccessToString) -split '[\r\n]'

for this cmdlet, which will return one or more lines containing the account name, permission type and permission levels contained within the ACL for the specified path.

Lastly, I learned how to use the Start-Process cmdlet to invoke a new local PowerShell session to run using different credentials. Similarly to what I did with the snippets in my last post, I’ve included the function defined in this script in the PowerShell profile for my admin account, along with a function in my standard account’s PowerShell profile built around the following command:

Start-Process powershell.exe -Credential $credential -ArgumentList "userf -user $u"

For clarity, the function also uses the Get-Credential cmdlet to generate an auth token for the admin account to be used, and is parametrised to accept a username $u. Userf is an alias defined in the admin account profile for the Check-UserFolders function described below.

Why create a function for this? Well, because I want to do more than just get the output from that cmdlet. Specifically, what I want to do is:

  1. Specify a username.
  2. Validate the username against AD.
  3. Retrieve the user’s profile and home directory paths from AD.
  4. For each path, query the ACL entries and check whether they include an entry for the user.
  5. Gracefully catch errors and exceptions at each stage, allowing logging if desired.

A braver sysadmin than I might even decide to add a step 6 in the above list, and use the related cmdlet Set-ACL to optionally invoke a permissions correction where required. For the time being, just querying the existing ACLs is enough for me, and having the function available as a parametrised alias is a helpful time saving.

So enough talking – here’s the script itself:

function Check-UserFolders {
param(
	[string]$user
)
	# A script to check the permissions on a user's profile and home directory.

	# Check if a user has been specified, prompt for input if not.
	$valid=$false
	do {
		if ($user) {
			try {
				$exists = Get-ADUser -identity $user
				$valid=$true
			} catch {
				Write-Host "Unable to find account $user, please try again."
				Clear-Variable -name user -force -erroraction silentlycontinue
				Start-Sleep 2
			}
		} else {
		    try {
			    [string]$user=Read-Host("Enter a username")
		    } catch {
			    Write-Host"Invalid username specified, please try again." 
			    Clear-Variable -name user -force -erroraction silentlycontinue
			    Start-Sleep 2
		    }
        }
	} while (!$valid)

So far, so simple. The main thing to note is that I’ve restructured my initial input loop so that it can accept parametrised input and still validate it in the same way that input supplied through the Read-Host prompt is validated.

    # Clear screen
    Clear-Host


	# Get home directory and profile paths
	$hpath=(Get-ADUser -identity $user -Properties HomeDirectory).HomeDirectory
	$ppath= $hpath.Replace("User Data","Profile")+".v2"

The only thing to note here is the mildly frustrating nature of post-XP roaming profiles, since the path as specified in AD doesn’t require a suffix, but as it exists on the filestore has a “.v2” extension.

	# Query ACLs for user home directory 
	if ((Test-Path $hpath)) {
        Write-Host "Checking permissions on home directory for $user. Path is:`n$hpath"
        [boolean]$hfound=$false
        $hperms=((Get-ACL -Path $hpath).AccessToString) -split '[\r\n]'
        for ($i=0;$i -lt $hperms.count;$i++) {
            $entry=$hperms[$i].ToString()
			if ($entry -like "*$user*") {
                $hfound=$true
				switch -wildcard ($entry) {
                    "*FullControl*" {
                        Write-Host "Permissions entry for $user found`n$entry`n" -ForegroundColor "Green"
                    }
				    "*ReadOnly*" {
                        Write-Host "Permissions entry for $user found`n$entry`n" -ForegroundColor "Yellow"
                    }
                	default {
                        Write-Host "Permissions entry for $user found`n$entry`n"
                    }
                }
			}
		}
		if (!$hfound) {
			Write-Host "No home directory permissions entry found for $user.`n"
		}
    } else {
		Write-Host "Cannot find user's home directory at the path specified:`n$hpath`n" -ForegroundColor "Red"
	}

This is the meat of the script. An if-else clause is wrapped around a Test-Path condition so that, if the relevant path doesn’t exist, the rest ofthe checks are skipped (rather than returning a series of errors). If the path does exist, the Get-ACL cmdlet is used to retrieve the AccessToString (split into multiple lines by the flag -split ‘[\r\n]’). A for-loop then iterates through each entry, using the ToString() method to convert each entry and use a wildcard switch statement to select entries relating to the user and display them in different colours depending on the permission types.

    # New line to insert space between directory and profile checks.
    Write-Host " "

	# Query ACLs for profile
	if ((Test-Path $ppath)) {
        Write-Host "Checking permissions on profile path for $user. Path is:`n"
        [boolean]$pfound=$false
        $pperms=((Get-ACL -Path $ppath).AccessToString) -split '[\r\n]'
		for ($i=0;$i -lt $pperms.count;$i++) {
            $entry=$pperms[$i].ToString()
			if ($entry -like "*$user*") {
				$pfound=$true
				switch -wildcard ($entry) {
                    "*FullControl" {
                        Write-Host "Permissions entry for $user found`n$entry`n" -ForegroundColor "Green" 
                    }
				    "*ReadOnly*" {
                        Write-Host "Permissions entry for $user found`n$entry`n" -ForegroundColor "Yellow" 
                    }
                	default {
                        Write-Host "Permissions entry for $user found`n$entry`n"
                    }
                }
			}
		}
		if (!$hfound) {
		    Write-Host "No profile permissions entry found for $user.`n"
		}
	} else {
		Write-Host "Cannot find user's profile at the path specified:`n$ppath`n" -ForegroundColor "Red"
	}
}

This second process is basically the same thing again, using the profile path rather than the home directory.

Populating non-integrated DNS for Active Directory

While setting up a couple of VMs on my test system recently it occurred to me that being able to automate DNS updates with the records required for Active Directory would be useful – partciularly for environments where AD DNS integration cannot be enabled (whether for technical or procedural reasons). Thus I spent a little time getting to grips with how the netlogon.dns file created during a domain controller configuration could be automatically processed. The DNS Server cmdlets present in PowerShell 4 are documented here.

The script as it appears below assumes that the netlogon.dns file has been created for a new forest. I’ll test it for the simpler scenarios of a new child domain or a new DC in an existing domain when I get time in the next few days. I’ll probably add in some extra logic to check whether records already exist before attempting to add them.

# Clear any existing variables
Remove-Variable -Name * -Force -Erroraction SilentlyContinue

# Define path for log file, get date for timestamps
$log      = (Get-Location).Path + "\AD_DNS_updates.log"
$date     = Get-Date

# Import the netlogon.dns file and process its contents
$source= "C:\Users\Administrator\Desktop\netlogon.dns"
$dnsinput=Import-CSV -path $source -Delimiter " " -header @("Record","TTL","IN","Rtype","Priority","Weight","Port","Target","Buffer")

$global:Zonename=($dnsinput[0].Record).TrimEnd(".")

function New-DNSEntry () {
	# Declare local variables based on inputs
	$Record	= $row.Record
	$ttl	= $row.TTL
	$Rtype	= $row.Rtype
	$p	= $row.Priority
	$w	= $row.Weight
	$port	= $row.Port
	$target	= $row.target

	# Use the $type variable to determine which records are required
	switch ($Rtype) {
		"A" {
			# Add now host entry
            if ($global:ZoneName -ne $Record) {
                $Name =$Record.Replace("$global:ZoneName","")
                $Name =$Name.TrimEnd(".")
            } else {
                $Name=$Record
            }
            try {
                Add-DNSServerResourceRecordA -ZoneName "$global:ZoneName" -Name "$Name" -IPV4address "$target" -Verbose | Out-File $log -append
            } catch {
				"Unable to add record; error returned is " + $_.Exception.Message  | Out-File $log -append
				" " + $_.Exception.Message  | Out-File $log -append
            }
		}
		"CNAME" {
			# Add new alias entry
			$Name =$Record.Replace("$global:ZoneName","")
            $Name =$Name.TrimEnd(".")
            try {
    			Add-DNSServerResourceRecordCName -ZoneName "$global:ZoneName" -Name "$Name" -HostNameAlias "$target" -Verbose | Out-File $log -append
            } catch {
				"Unable to add record; error returned is " + $_.Exception.Message | Out-File $log -append
				" " + $_.Exception.Message  | Out-File $log -append
			}
		}
		"SRV"	{
			# Add new service entry
			$Name =$Record.Replace("$global:ZoneName","")
            $Name =$Name.TrimEnd(".")
            try {
                Add-DnsServerResourceRecord -Srv -ZoneName "$global:ZoneName" -Name "$Name" -DomainName "$target" -Priority $p -Weight $w -Port $port -Verbose | Out-File $log -append
            } catch {
                "Unable to add record; error returned is " + $_.Exception.Message | Out-File $log -append
				" " + $_.Exception.Message  | Out-File $log -append
			}
		}
		default {
			# Notify that unexpected entry type found
			"Unable to find procedure for record type" + $Rtype + ";No DNS entry created for Record" + $Record + " and destination " + $target | Out-File $log -append
			" " + $_.Exception.Message  | Out-File $log -append
		}
	}
    Clear-Variable -Name Record,TTL,Rtype,Priority,Weight,Port,Target,Name -Force -ErrorAction SilentlyContinue
}

function Process-Inputs {
    foreach ($row in $dnsinput) {
	    # Remove the unnecessary ; that precedes certain records

	    if ($row.Record -eq ";") {
		    $row.Record	= $row.TTL
		    $row.TTL	= $row.IN
		    $row.IN	= $row.Rtype
		    $row.Rtype	= $row.Priority
		    $row.Priority	= $row.Weight
		    $row.Weight	= $row.Port
		    $row.Port	= $row.Target
		    $row.Target = $row.Buffer
            $row.Buffer = ""
	    }

	    # Correct the value placement for host records so that a standard function can be used for all new record creations.
	
	    if (($row.Rtype -eq "A") -or ($row.Rtype -eq "CNAME")) {
		    $row.Target = $row.Priority
		    $row.Priority=""
	    }
	
	    # Remove trailing period from the DNS value
	    $row.Record = $row.Record.TrimEnd(".")
        $row.Target = $row.Target.TrimEnd(".")

	    # Call NewDNSEntry function
	    New-DNSEntry("$row.Record","$row.TTL","$row.Rtype","$row.Priority","$row.Weight","$row.Port","$row.Target")
    }
}

"$date" + ": Commencing import of source file " + $source | Out-File $log -append
" " | Out-File $log -append

Process-Inputs
"File import complete." | Out-File $log -append

Automatically identifying, retrieving and installing an update for installed software

Last week, I wrote about how to create and export a list of installed software using PowerShell. I mentioned that while this might be of limited use by itself, it could be integrated with other scripts to exercise control over the software installed on a given system. This is what I want to write about today.

As a starting point, consider this simple outline for a hypothetical script-based software manager:

function Get-InstalledSWList {
	See last post for an example of how to do this
}

function Check-InstalledSW {
	# Read values from InstalledSWList, parse into usable format
	
	# Retrieve related values from some defined source eg where to check for updates
	
	# Check for update availability
}	

function Update-InstalledSW {
	# Retrieve updated version if available
	
	# Install updated version
}

function Remove-InstalledSW {
	# Optional - for licencing-restricted software, this function could be invoked to remove software from a machine for which no licence is available.
}

If you’ve ever dealt with software packaging/updating you know how tediously complicated this can get for the range of software packages, installation types and installation sources that exist. So for this post I’m going to use a specific example of how the above functions would work for a specific package; this will illustrate how useful PowerShell could be in this context, but also the non-trivial amount of work involved in creating an initial profile of managed software packages.

I’m going to use Firefox as an example, not least because an update has been released in the last few days. Looking at the output file for last week’s script and choosing the row for Firefox, I get a series of entries as follows:

#	Registry Key Title			Display Name				Display Version	Install Location			Uninstall string
92	Mozilla Firefox 32.0.3 (x86 en-GB)	Mozilla Firefox 32.0.3 (x86 en-GB)	32.0.3		C:\Program Files (x86)\Mozilla Firefox	C:\Program Files (x86)\Mozilla Firefox\uninstall\helper.exe

Additional information I happen to know about Firefox that makes this a bit easier; the installer supports both in-place upgrades and silent installations (using the switch ‘-ms’). This means that we don’t have to go through the tedium of completely removing it before installing the new version, because the FF installer takes care of all the housekeeping natively (unlike some installers I’ve seen from companies that should know better *cough cough* Skype *cough cough* Java).

So the first things we want to do are go parse these values and figure out what information we need. Obviously, Display Version is important and easily useful. Ditto Install Location (although in this case since it’s installed in the default location we can ignore it). However, the language version is also relevant and not so useful – it’s part of the Display Name. So we need to parse that and use regular expressions to get the part we want.

Assume that the Get-InstalledSW function has made available the following variables for us:

$displayversion="32.0.3"
$displayname="Mozilla Firefox 32.0.3 (x86 en-GB)"
$installocation="C:\Program Files (x86)\Mozilla Firefox"

To extract the part of the Display Name that we want, we can do the following:

# Create a new, empty array
$fftypesplit=@()

# Split the display version using an easy delimiter - in this case "(x86 " - as a regular expression
$displayname -split '\(x86' | foreach {$fftypesplit+= $_}

# Remove the closing bracket using a Replace string operation
$fflang = $fftypesplit[1].Replace(")","")

We now have the additional variable $fflang, with the value “en-GB”. What next?

Next we need to check if there’s a newer version of the software available. As I alluded to above, this part can be extraordinarily tedious due to the range of distribution mechanisms used by software publishers, even for free-to-use software. In the case of Firefox, we’re going to start with the releases page, at https://www.mozilla.org/en-US/firefox/releases/.

# Declare a variable for the releases page URL
$ffreleases = "https://www.mozilla.org/en-US/firefox/releases/"

# Use Invoke-WebRequest to create a new variable populated with all the arrays on the releases page
$FFVerList = (Invoke-WebRequest -URI $ffreleases).Links.Href

So now we have an array of links in an array. At first glance, this doesn’t seem much help:

/en-US/
/en-US/firefox/desktop/
/en-US/firefox/desktop/customize/
/en-US/firefox/desktop/fast/
https://developer.mozilla.org/docs/Tools
/en-US/firefox/desktop/trust/
/en-US/firefox/android/
https://addons.mozilla.org/android/
/en-US/firefox/android/faq/
/en-US/firefox/channel/
/en-US/firefox/channel/#aurora
/en-US/firefox/channel/#beta
/en-US/firefox/
/en-US/firefox/organizations/
https://addons.mozilla.org/
https://addons.mozilla.org/firefox/
https://addons.mozilla.org/android/
https://addons.mozilla.org/firefox/themes/
https://support.mozilla.org/
https://support.mozilla.org/products/firefox
https://support.mozilla.org/products/mobile
/en-US/firefox/about/
Home
/en-US/firefox/about/ /join /en-US/about/participate/ https://blog.mozilla.org/press/ /en-US/firefox/brand/ https://careers.mozilla.org /en-US/about/partnerships.html /en-US/contact/spaces/ /en-US/firefox/ /en-US/ /en-US/firefox/new/ ../33.0/releasenotes/ ../32.0/releasenotes/ ../32.0.1/releasenotes/ ../32.0.2/releasenotes/ ../32.0.3/releasenotes/ ../31.0/releasenotes/ ../31.2.0/releasenotes/ ../31.1.0/releasenotes/ ../31.1.1/releasenotes/ ../30.0/releasenotes/

But after an initial set of irrelevant links we get to what we want – named directories for each release. So we can use regular expressions to identify only those links relating to specific releases, and then compare strings to check if a newer release exists.

# Iterate through each link
foreach ($link in $FFVerList) {
	
	# Check if the link starts by going up a level, and ignore it if it does not.
	if ($link.StartsWith("../") {
	
		# Extract the release version number as string by removing the "../" prefix and then the "/releasenotes/" suffix
		$linkver=($link.Replace("../",""))
		$linkver=($linkver.Replace("/releasenotes/",""))

		# Use the version type to compare $linkver to $ffver, and set a variable if $linkver is greater.
		if ([version]$linkver -gt [version]$ffver) {
			
			# In case more than one new release exists, we also check if the $newver variable has been set already and if so, whether we need to change it for a newer version.
			if ($newver) {
				# Compare the current version against the existing value for $newver, and update $newver if the current version is greater
				if ([version]$linkver -gt [version]$newver) {
					$newver=$linkver
					$needs_update = $true
				}
			} else {
				$newver=$linkver
				$needs_update = $true
		}
	}
}
# After iterating through the list, check if $newver has been declared and if so, write the details to screen
if ($newver) {
	Write-Host "A new version is available, with version number "$newver
	Write-Host " "
} else {
	Write-Host "The current installation is already running the latest version available, version "$ffver
	Write-Host " "
}

Now we’ve got a boolean variable $needs_update that we can use to decide whether to invoke the Update-InstalledSW function, and the new version (if it exists) as $newver. Next, we need to define our source and destination files because we’re using Invoke-WebRequest again.

For the source file, I went to the Mozilla website using Chrome, selected the language I wanted (en-GB, listed as “English (British)” in the dropdown menu) and then retrieved the link location for the file that is offered for download. That link is:

https://download-installer.cdn.mozilla.net/pub/firefox/releases/33.0/win32/en-GB/Firefox%20Setup%20Stub%2033.0.exe

I want to be able to match the language and versions to whatever the script outputs, so I define a new variable using the format of the link:

# Assemble the link using the $newver and $fflang variables where required
$source = "https://download-installer.cdn.mozilla.net/pub/firefox/releases/"+$newver+"/win32/"+$fflang+"/Firefox%20Setup%20Stub%20"+$newver+".exe"

# Define a name and path for the output file
$dest= $env:temp+"\Firefox_"+$newver+"_"+$fflang+".exe"

Now we’re ready to use Invoke-WebRequest to retrieve the new installation package from Mozilla:

Invoke-WebRequest -URI $source -Outfile $dest

We’re nearly finished now; we just need to install the new version. Before we can do that, though, we need to check for any existing instances of Firefox already running on the system and close them down. We might also want to notify the user that the browser needs to be closed to install the update and wait for confirmation before proceeding. One last block of scripting should see us through:

# Check for running instances of Firefox
try {
	$running = (Get-Process -ProcessName "firefox" -ErrorAction SilentlyContinue)
} catch {
	$running = $false
}
# Where an active instance of Firefox is detected, prompt the user for input. This part is optional but good practice as it ensures that the end user has a chance to save any open documents or work in progress and allows them to defer the installation if they are busy.
if ($running) {
	do {
		Clear-Host
		$input = Read-Host("A new version of Firefox is available and ready to install. This requires that all existing browser sessions be closed. Please save your work and close the browser, then press Y to proceed. Alternatively, press N to defer the update to a later time")
		switch ($input) {
			"Y" {
				$proceed = $true
				$choice = $true
			}
			"N" {
				$proceed = $false
				$choice = $true
			}
			default {
				Write-Host "Invalid selection entered, please try again."
				Start-Sleep 3
			}
		}
	} While (!$choice)
	
	# Check if the user selected to proceed with the installation or not
	if ($proceed) {
		# If the user selected to proceed, check if Firefox is still running or not
		$stillrunning = (Get-Process -ProcessName "firefox" -ErrorAction SilentlyContinue)
		
		# While it is still running, iterate the Stop-Process cmdlet until no instances are found
		do {
			Stop-Process -ProcessName "firefox" -Force
			try {
				$stillrunning = (Get-Process -ProcessName "firefox" -ErrorAction SilentlyContinue)
			} catch {
				$stillrunning = $false
			}
		} while ($stillrunning)
		
		# When we're ready to proceed, call the software installer
		try {
			cmd /c $dest -ms
			Write-Host "Firefox updating process complete; you may now relaunch the browser."
			Start-Sleep 10
		} catch {
			Write-Host "Unexpected error when calling installer, error message was "$_.Exception.Message
		}
	} else {
		Write-Host "You have selected to defer the installation. This script will now terminate."
	}
} else {
	# Proceed with installation as no active instances are detected
	try {
		cmd /c $dest -ms
		Write-Host "Firefox updating process complete; you may now relaunch the browser."
		Start-Sleep 10
	} catch {
		Write-Host "Unexpected error when calling installer, error message was "$_.Exception.Message
	}
}

Finished!

I think it’s now clear why this approach is versatile but non-trivial if implemented across a wide software inventory. If we revise the initial script I suggested to more closely match the steps I have described above, fleshing out the optional components for licence-compliance, we end up with something more like this:

function Get-InstalledSWList {
	# See last post for an example of how to do this
}

function Get-ManagedSWList {
	# Retrieve related values from a defined source or location. Must include: the process name when software is running; the silent install switch; boolean to indicate whether in-place upgrades are supported. May also require: per-item function to retrieve the latest release version; boolean to determine whether updates should be applied automatically or not ; approximate size of install file download; boolean for restricted (eg commercially licenced) software
}	

function Get-MachineSWLicences {
	# Retrieve a list of software packages and versions which are commercially licenced for this client
}
	
function Check-InstalledSW {
	# Read values from InstalledSWList and MachineSWLicences, parse into usable format and compare with ManagedSWList
	
	# Identify packages which require action (actions may be Install, Update, Remove)
}	
 
function Get-SWUpdates {
	# Check network type to ensure that charges will not be incurred, potentially taking into account total expected filesize for available updates
	
	# Download all available updates, populate an array with their locations
}

function Install-SWUpdates {
	# Iterate through the array created by Get-SWUpdates, installing updates sequentially
}

function Get-LicencedSW {
	# Check network type to ensure that charges will not be incurred, potentially taking into account total expected filesize for available updates

	# For any licenced software which is not already installed, retrieve installation media and populate an array with their locations
	
	# For any licenced software which is installed but not licenced, populate an array with the relevant information
}

function Install-LicencedSW {
	# Iterate through the array created by Get-LicencedSW, install software packages sequentially. This would need to take into account pre-requisite components and potential reboot requirements for installation completion.
}	

function Remove-LicencedSW {
	# Iterate through the array created by Get-LicencedSW, remove packages where required and notify both the primary user and administrator for the machine of the actions taken.
}

Which is still a very high-level conceptual mapping of the overall process, and doesn’t take into account the probable requirement to scan locations other than the registry for the presence of software. For example, it might be desirable to get an array of all directories under Program Files/Program Files (x86) and compare that to the list of directories under Program Files/Program Files (x86) that we get from Get-InstalledSWList to identify any anomalies. Or it may be desirable to scan an entire filesystem’s non-OS directories for executable files and cehck them against a profile of known or allowed locations.

I do intend to pursue this further; it’s something that interests me and I’ve found that even where free-to-use tools exist for end users (such as the promising-but-still-buggy Secunia Personal Security Inspector) they are more resource intensive and demanding than I think is necessarily required. If nothing else, having a script or set of scripts I can use that will reliably check at least the most common web-facing applications installed on machines (whether systems I manage for an employer or those owned by friends and family who ask me for assistance) would be useful.

Getting a per-system software inventory

This latest script is a bit of a swerve from my last post, but I was reading about PowerShell providers recently and wanted to experiment with the Registry provider, since in the past I’ve learned the hard way that any significant amount of registry work in batch files is painful at best.

My intention with this script is to generate a CSV file containing details of all software registered with the Windows Installer in the registry. This can be useful not just for tracking installed software in environments where centralised systems for doing this are not feasible (whether  for organisational size or budgetary reasons), but also for identifying out-dated or licencing-restricted software that requires the attention of an administrator. At some point in the near future I’ll write another script that processes the output of this script and a set of rules provided by the administrator to take required actions, which can include removing unauthorised software, installing an updated software release or notifying the administrator of specific installed packages. Beyond that, my idealised version would be tied into a network resource (be it a network share or a webserver) from which updated rulesets and installation media could be derived.

The fundamentals of this script are to iterate through the Uninstall registry key subkeys (for both 32-bit and 64-bit software installs) to get a list of installed software and related details. The principles used in this script can also be used to update the registry information for software installers which don’t follow best practice (eg developers who think that putting the version number in the DisplayName is a good idea). There are other ways around this (such as using Orca to edit MSI installation packages) but they are not always available, and in some cases (such as requiring signed installation packages) it’s better to just modify the registry information for the installed software than to change the installed package.

One thing to note is that if you switch from the Environment provider to the Registry provider, you need to switch back to the Environment provider to use file-based cmdlets like Out-File. This means that if you interrupt the script before it finishes, the ISE or PowerShell session will most likely still have its location set as the Registry provider. That’s enough for now – let’s get on with looking at the script itself.

function Get-InstalledSoftware {
    # Set the location as the registry HKLM node:
    Set-location HKLM:

    # Initialise the hashtable
    $global:swlist=$null
    $global:swlist= @{}

    # Define the paths for software installations and the methods for retrieving a list of installed software under those paths
    $32bitswpath = "Software\WoW6432Node\Microsoft\Windows\CurrentVersion\Uninstall"
    $32bitswlist = gci -path $32bitswpath
    
    # Iterate through items in the list of 32-bit installation registry keys, extracting the properties we want 
    $i= 0
    do {
        # Retrieve the properties we need:
        $currobj = (Get-ItemProperty -path $32bitswlist[$i])
        if ($currobj.DisplayName) {
            $displayname = $currobj.DisplayName.ToString()
        }
        if ($currobj.DisplayVersion) {
            $displayversion = $currobj.DisplayVersion.ToString()
        }
        if ($currobj.InstallLocation) {
            $installlocation = $currobj.InstallLocation.ToString()
        }
        if ($currobj.UninstallString) {
            $uninstallstring = $currobj.UninstallString.ToString()
        }
        # In case of entries with null values for the above, also grab the PSChildName attribute
        $psName = $32bitswlist[$i].PSChildName

        # Assign the properties to a new row in the array
        try {
            $global:swlist.Add("$i",@{"Registry Key Name" = $psName; "DisplayName" = $displayname;"DisplayVersion" = $displayversion;"InstallLocation" = $installlocation;"UninstallString" =$uninstallstring})
            Clear-Variable -Name psName,displayname,displayversion,installlocation,uninstallstring -force -ErrorAction SilentlyContinue
        } catch {
            Write-Host "Unexpected problem getting item properties for path "$32bitswlist[$i]
            WRite-Host "Error message was" $_.Exception.Message
            Write-Host " "
        }
        $i++
    } while ($i -lt $32bitswlist.count)

    if ($OStype -eq "64-bit") {
        $64bitswpath = "Software\Microsoft\Windows\CurrentVersion\Uninstall"
        $64bitswlist = gci -path $64bitswpath
    
        # Repeat for items in the list of 64-bit installation registry keys, extracting the properties we want. Since we're using the counter as an index in the hashtable, we don't reset $i to zero but instead add a second counter based on it.
        do {
            $j = ($i - $32bitswlist.count)
            # Retrieve the properties we need:
            $currobj = (Get-ItemProperty -path $64bitswlist[$j])
            if ($currobj.DisplayName) {
                $displayname = $currobj.DisplayName.ToString()
            }
            if ($currobj.DisplayVersion) {
                $displayversion = $currobj.DisplayVersion.ToString()
            }
            if ($currobj.InstallLocation) {
                $installlocation = $currobj.InstallLocation.ToString()
            }
            if ($currobj.UninstallString) {
                $uninstallstring = $currobj.UninstallString.ToString()
            }
            # In case of entries with null values for the above, also grab the PSChildName attribute
            $psName = $64bitswlist[$j].PSChildName

            # Assign the properties to a new row in the array
            try {
                $swlist.Add("$i",@{"Registry Key Name" = $psName; "DisplayName" = $displayname;"DisplayVersion" = $displayversion;"InstallLocation" = $installlocation;"UninstallString" =$uninstallstring})
            } catch {
                Write-Host "Unexpected problem getting item properties for path "$64bitswlist[$j]
                WRite-Host "Error message was" $_.Exception.Message
                Write-Host " "
            }
            Clear-Variable -Name j,psName,displayname,displayversion,installlocation,uninstallstring -force -ErrorAction SilentlyContinue
            $i++
        } while (($i - $32bitswlist.count) -lt $64bitswlist.count)
    }
#>
}

function Export-SoftwareList ($swlist) {
    # Define the output file name, using both the local computer's hostname and the date & time at which the file is created.
    $output = "$source"+"\"+"Installed_Software_"+$env:Computername+"_"+"$OStype"+"_"+(Get-date -format yyyyMMddHHmm)+".csv"

    # Define the desired headers for the CSV output file
    $headers = "Index,Registry Key Name,Display Name,Display Version,Install Location,Uninstall String"

    # Output the headers to the file
    $headers | Out-File $output -append

    # Iterate through each entry in the swlist hashtable, creating a comma-separated string that can be piped to the output file.
    $k=0
    do {
        $reg=$swlist["$k"]["Registry Key Name"]
        $dispname=$swlist["$k"]["DisplayName"]
        $dispver=$swlist["$k"]["DisplayVersion"]
        $instloc=$swlist["$k"]["InstallLocation"]
        $uninst=$swlist["$k"]["UninstallString"]

        "$k"+","+$reg+","+$dispname+","+$dispver+","+$instloc+","+$uninst | Out-File $output -append
        $k++
    } while ($k -lt $swlist.count)
}

# Capture the starting location & PSProvider for the script
$source=(Get-Location).Path

# Capture the OS architecture
$OStype = ((Get-WMIObject -Class win32_OperatingSystem -ComputerName $env:ComputerName).OSArchitecture)

# Call the inventory functions
Get-InstalledSoftware
Export-SoftwareList $swlist

# Switch back to the starting location & PSProvider
set-location $source

Deploying printers with PowerShell

I’ve mentioned before that my department is a mixed-platform environment; as such any infrastructure service has to be configured in such a way as to minimise the maintenance overhead, and ensure that users on all platforms can use the service easily. For this reason, we have a departmental print server sharing printers by LPD.

Deploying printers automatically using LPD has not proven particularly simple. Although the Standard TCP/IP port implementation in Windows has long incorporated the ability to specify an LPR printer port, I was unable to get this to work with our LPD print server. After some experimentation when Windows XP was still our primary deployed OS, I figured out an inelegant-but-functional method of scripting the installation of printers by making use of the HP Universal Printing Driver installation system (since all our departmental printers are HP models). It looked something like this:

  1. Use the sysoc function to enable the LPR Port Monitor.
  2. Stop the Windows Print Spooler using
    net stop Spooler
  3. Create each LPR port required by adding registry keys as follows:
    1. REG ADD “HKEY_LOCAL_MACHINE\SYSTEM\CurrentControlSet\Control\Print\Monitors\LPR Port\Ports\<printserver>:<queuename>” /f
    2. REG ADD “HKEY_LOCAL_MACHINE\SYSTEM\CurrentControlSet\Control\Print\Monitors\LPR Port\Ports\<printserver>:<queuename>” /v “Server Name” /t REG_SZ /d <printserver> /f
    3. REG ADD “HKEY_LOCAL_MACHINE\SYSTEM\CurrentControlSet\Control\Print\Monitors\LPR Port\Ports\<printserver>:<queuename>” /v “Printer Name” /t REG_SZ /d colour2 /f
    4. REG ADD “HKEY_LOCAL_MACHINE\SYSTEM\CurrentControlSet\Control\Print\Monitors\LPR Port\Ports\<printserver>:<queuename>” /v OldSunCompatibility /t REG_DWORD /d 0 /f
    5. REG ADD “HKEY_LOCAL_MACHINE\SYSTEM\CurrentControlSet\Control\Print\Monitors\LPR Port\Ports\<printserver>:<queuename>” /v HpUxCompatibility /t REG_DWORD /d 0 /f
    6. REG ADD “HKEY_LOCAL_MACHINE\SYSTEM\CurrentControlSet\Control\Print\Monitors\LPR Port\Ports\<printserver>:<queuename>\Timeouts” /f
    7. REG ADD “HKEY_LOCAL_MACHINE\SYSTEM\CurrentControlSet\Control\Print\Monitors\LPR Port\Ports\<printserver>:<queuename>\Timeouts” /v CommandTimeout /t REG_DWORD /d 120 /f
    8. REG ADD “HKEY_LOCAL_MACHINE\SYSTEM\CurrentControlSet\Control\Print\Monitors\LPR Port\Ports\<printserver>:<queuename>\Timeouts” /v DataTimeout /t REG_DWORD /d 300 /f
  4. Restart the Windows PRint Spooler using
    net start Spooler
  5. For each printer, install the printer using the HP Universal Printing Driver as follows:
    1. install.exe /q /npf /nd /pfduplex=1 /n”<printername>” /sm<printserver>:<queuename>
  6. For each printer, overwrite the registry key entry to correct the assigned printer as follows:
    1. REG ADD “HKEY_LOCAL_MACHINE\SOFTWARE\Microsoft\Windows NT\CurrentVersion\Print\Printers\<printername>” /v Port /d <printserver>:<queuename> /f

Considerably later, I stumbled across a TechNet article about Network Printer Ports, from which I learned the reason I had been unable to make the Standard TCP/IP port communicate effectively with our LPD print server:

“LPR must include an accurate byte count in the control file, but it cannot get it from the local print provider. After LPRMON receives a document from the local print provider, it spools it a second time as a temporary file in the System32 subfolder, finds the size of that file, and sends the size to the LPD print server. The standard TCP/IP port monitor does not adhere to this RFC requirement and sends a very large byte count to the LPD to begin printing. After the job is complete, it simply closes the connection. This step reduces the spool time and disk I/O by eliminating the temporary spool file creation.”

This led me to a much better process for installing printers via script, along the following lines:

:: Ensure the script is run from the same directory as the driver that will be used for the printer
:: Capture the script's initial location as INITDIR
Set INITDIR=%CD%

:: Install the required printer driver
cscript C:\Windows\System32\Printing_Admin_Scripts\en-US\prndrvr.vbs -a -m "[DriverName]" -v 3 -h "%cd%" -i "%cd%\[DriverFileName]"

:: Create each port with a variation on the following line
cscript C:\Windows\System32\Printing_Admin_Scripts\en-US\prnport.vbs -a -r "[PortName]" -h [PrintServerFQDN] -o lpr -q [QueueName] -n 9100 -2e

:: Create each printer with a variation on the following line
cscript C:\Windows\System32\Printing_Admin_Scripts\en-US\prnmngr.vbs -a -p "[PrinterName]" -m "[DriverName]" -r "[PrinterName]"

Echo All printers installed.

While studying for the 070-410 exam I learned about the Add-Printer and Add-PrinterPort cmdlets available in PowerShell 4.0 with Windows 8.1 – this suggested that a more elegant method now existed for deploying printers. This is the form of the script we now use for deploying printers:

$path = Split-Path -parent $MyInvocation.MyCommand.Definition

$install = '"start /wait '+$path+'\Install.exe /q /h /infstage /infremove'+'"'
cmd /c $install

# Add driver to local printer drivers
$infname = "HP Universal Printing PS"
add-printerdriver -Name $infname

# After installation of driver, query the driver installation and get the driver name
$driver = get-printerdriver -Name "*HP Universal*"
$drivername = $driver.Name

# For each printer port:
Write-Host "Creating printer ports..."
try {
    $port=Get-PrinterPort -Name "[Portname]" -ErrorAction SilentlyContinue
} catch {
}
if (!$port) {
    add-printerport -Name "[Portname]" -lprhostaddress [printserver] -lprbytecounting -lprqueuename [queuename]
}
Clear-Variable -Name port

# For each printer:
try {
    $printer=Get-Printer -Name "[Printername]"
} catch {
}
if (!$printer) {
    add-printer -name "[Printername]" -portname "[Portname]" -drivername $drivername
} else {
    Write-Host "Printer already exists with name "$printer
    Write-Host
}
clear-Variable -name printer

Write-Host "Printer installation complete."

The main frustration with this method is getting the HP Universal Printing driver to install correctly; however, the script outlined above can simply be copied into the same directory as the extracted contents of the latest HP UPD file and it will work.

Future revisions of this script will make use of the Set-PrintConfiguration cmdlet to configure the functionality of each printer as required. I would also like to incorporate additional logic so that the script can update the driver used by existing printers.

Bulk-downloading files with PowerShell

Having seen Eric Ligman’s MSDN Blogpost a little while ago containing links to over 100 free Microsoft Ebooks, I wondered if it was possible to automate the download process. Ligman has thus far opted not to provide a single download with all the ebooks contained, but has provided this post on the topic, which has a text file including direct individual links which redirect to the files in question.

As of version 3.0, Powershell can us this to download the files for us.

$counter= 000
$error = 000
$invalid = 000
$csv = import-CSV -path C:\tmp\MSFTEbooks.txt -Header "Link" -Delimiter ","

Foreach ($line in $csv) {
	# For each line, we define a variable for the link as extracted from the file
	$link = $csv[$counter].Link

	# Now we need to check our inputs, as the text file provided by Mr Ligman includes some lines which are not links.
	if ($link -like "http*") {
		# As there does not appear to be a consistent method for obtaining the remote filename to which a URI redirects, I opted to instead assign an arbitrary filename to the retrieved documents.
		$file = "C:\tmp\Ebooks\File_"+$counter

		# Now we're ready to use Invoke-WebRequest to retrieve each link in turn and save it as a file
		try {
			Invoke-WebRequest -uri $link -Outfile $file
			$counter++
		} catch {
			Write-Host "Error attempting to download file" $counter
			Write-Host "Error message is" $_.Exception.Message
			Write-Host " "
			$counter++
			$error++
		}
	} else {
		Write-Host "Current line is not a link, value is "$link
		$invalid++
}
Write-Host "Downloads complete."
Write-Host "Number of downloads attempted:"$counter
Write-Host "Number of downloads failed:"$error
Write-Host "Number of invalid lines in input file:"$invalid
# Finished

The two issues with this method are:
1) It doesn’t assign contextually-useful filenames to the downloads, and
2) It doesn’t identify the filetype.

I haven’t found a solution for issue 1 thus far, but for issue 2 the easiest approach is Marco Pontello’s TrID – download the executable and the TrIDDefs.TRD definition file, run it at the command line using a command like:

trid.exe c:\tmp\Ebooks\* -ae

and it will identify the filetypes and rename them to add the appropriate extension.